


Question about saving seeds
anney
16 years ago
Related Stories
GARDENING GUIDESHow to Plant a New Lawn From Seed
Choose from more grass varieties and save money over sod by starting your lawn from seed
Full Story
CONTAINER GARDENS8 Easy Container Plants to Grow From Seed
Get beautiful blooms and herbs in summer by starting these choice garden picks from seed in spring
Full Story
MOST POPULAR8 Questions to Ask Yourself Before Meeting With Your Designer
Thinking in advance about how you use your space will get your first design consultation off to its best start
Full Story
GARDENING GUIDESNo-Regret Plants: 5 Questions Smart Shoppers Ask
Quit wasting money and time at the garden center. This checklist will ensure that the plants you're eyeing will stick around in your yard
Full Story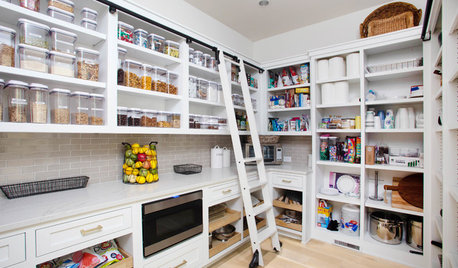
KITCHEN DESIGN9 Questions to Ask When Planning a Kitchen Pantry
Avoid blunders and get the storage space and layout you need by asking these questions before you begin
Full StoryREMODELING GUIDESConsidering a Fixer-Upper? 15 Questions to Ask First
Learn about the hidden costs and treasures of older homes to avoid budget surprises and accidentally tossing valuable features
Full Story
WORKING WITH PROS9 Questions to Ask a Home Remodeler Before You Meet
Save time and effort by ruling out deal breakers with your contractor before an in-person session
Full Story
ORGANIZINGPre-Storage Checklist: 10 Questions to Ask Yourself Before You Store
Wait, stop. Do you really need to keep that item you’re about to put into storage?
Full Story
WORKING WITH PROS10 Questions to Ask Potential Contractors
Ensure the right fit by interviewing general contractors about topics that go beyond the basics
Full Story
digdirt2
korney19
Related Discussions
Questions about saving seeds to plant next year
Q
Questions about Saving Seeds
Q
Question about saving peeper seeds.
Q
Question about saving Trumpet Seeds
Q
carolyn137
anneyOriginal Author
anneyOriginal Author
gonefishin
dangould
carolyn137
korney19
carolyn137
HoosierCheroKee
korney19
carolyn137
oldroser
stage_rat
anneyOriginal Author
HoosierCheroKee
anneyOriginal Author
outsiders71
anneyOriginal Author
outsiders71
korney19
korney19
gonefishin
johnh9600
gonefishin
johnh9600
yardenman
naturegirl_2007 5B SW Michigan
digdirt2
carolyn137
naturegirl_2007 5B SW Michigan
digdirt2
carolyn137
naturegirl_2007 5B SW Michigan
HoosierCheroKee