


Does growing your own vegetables save money?
prairiemoon2 z6b MA
9 years ago
Featured Answer
Sort by:Oldest
Comments (64)

tripleione
9 years ago
jonathanpassey
9 years agoRelated Discussions
Reasons to Grow Your Own Onions?
Comments (10)Lots of reasons. I grow then because they are super easy when using sets or transplants (both of which I can get for a very reasonable price at a local farm/feed store). Onions never have pest problems for me. No large animal damage either: never lost them to groundhogs, rabbits, or deer. They can wait a bit to be harvested if I'm on vacation for a week or busy with other things....unlike beans and zucchini which will shut down production for awhile if I neglect to harvest. I can grow as many as our family uses in only a small part of the garden. I can use them when they are young or wait til they mature. They are relatively quick and easy to harvest and are easy to store for a long time. I don't even have to can or freeze them to keep them for several months. I like being able to eat something from my garden as many days of the year as possible and softneck garlic and onions make that easy to do even if I don't do much freezing, canning, or drying. Sure, I could buy them for very little $, but they aren't "mine" and being "mine" makes them special to me :) So, yeah, lots of reasons! If I had very limited space I might concentrate more on high $ value items and super tasty garden produce only. But for now, I'll continue to grow some onions each year....See MoreIntelliFlo 4x160 vs. 1.5hp pump- does it really save you money?
Comments (5)To all, It is with great hesitation that I post this information as you are here to enjoy your pool not get all tied up in technicalities. Like you I do not want to hear how the watch is made when I ask what time it is but due to the incredible amount of questions on IntelliFlo and the national concern on energy costs I am offering the following information. The Pump Affinity Law is not my law or PentairÂs Law it is physics and hydraulics laws. It is what happens to pumps, water and power when pumps operate at different speeds Pump Affinity Law Speed1 = Flow1 Speed2 Flow2 (Flow is ½ than high speed) Speed1= (Pressure1)2 (Pressure is squared 2x2x2) Speed2 (Pressure2)2 (Pressure is squared 2x2x2) Speed1= (Power1)3 (Power consumed is cubed 2x2x2x2) Speed2 (Power2)3 (Power consumed is cubed 2x2x2x2) Now because of my inability to understand math in any version I have translated the formulas above to something I can understand: LIGHT BULBS !! EXAMPLE  At 3450 RPMÂs you have a flow of 66 GPM. You use 2,000 watts at this RPM (20 100 watt light bulbs) If the RPM speed is reduced in half to 1725 RPMÂs, per the formula above, the flow is ½ (33 GPMÂs). But your power consumes is 1/8th at high speed (cubed) . Also please note my just reducing the RPMÂs from 3,450 by just 450 RPMÂs the energy consumes is almost cut in half. Speed Flow Power (100 Watt Light Bulbs) RPM GPM WATTS 3450 66 2000 (20 light bulbs) 3000 55 1157 (11.5 light bulbs) 2400 44 593 (6 light bulbs) 1725 33 250 (3 light bulbs) 1200 22 74 (1 light bulb) 600 11 9 (about a 10 watt bulb) The point of this is you can know see the amazing savings by a pump that can do various speeds. Deek...See MoreWhat have you done this week to save money in your household?
Comments (35)Carol - Here's the short and long version of the recipe. I have it taped to my bread machine on a 3x5 card. It's our everyday bread, and I also use it for dinner rolls, cinnamon rolls, burger buns and hot dog buns. I've also included the long version of the recipe which includes instructions for making it in the bread machine, as well as by hand. I lovingly call the recipe "Mildred Bread". It was based on a recipe my friend, Mildred, got from Pleasant Hill Grain and some input from me. Sponge: 3/4 c. warm buttermilk (I use kefir) 3/4 c. warm water 2-1/2 c. milled whole wheat flour 1/4 t. ascorbic acid 2 t. instant yeast Mix on quick dough cycle for a few minutes. Stop machine and rest the sponge at least 2-1/2-hours. Stir in these ingredients: 1/3-1/2 c. chia seed goop (optional) 2 T. coconut oil (butter or vegetable oil can also be used) 2 T. agave nectar (or honey) 1 egg Add to the top: 2-1/4 c. whole wheat flour 2 t. salt (on top) Process on the quick dough cycle. Remove as soon as the kneading has stopped. Note: I sometimes add 1/3-1/2 c. multi-grain cereal at the add-in beep, and also add 2 T. flaxmeal. ----------------------------------------------------- The long version: 100% Whole Wheat Bread Bread Machine (changes for by hand in italic) Sponge: 3/4 c. lukewarm buttermilk (I use homemade kefir.) 3/4 c. lukewarm water 2-1/2 c. freshly-milled whole wheat flour (Prairie Gold from Wheat Montana is my favorite wheat) 1/4 t. ascorbic acid* 2 t. SAF-Instant Yeast Mix these ingredients in the bread machine pan and set the machine to QUICK DOUGH. As soon as the mixture is well mixed, unplug the machine and allow to sit (with the lid closed) at least 2-1/2 hours or up to 12 hours, or something in between. If you use a red variety of wheat, it will be less acidic-tasting if you use a 12-hour sponge. After the sponge has set, mix these ingredients into the sponge: 2 T. melted coconut oil (or butter or veg. oil) 2 T. agave nectar (or honey) 1 egg (I also add 1/3-1/2 c. chia seed gel. **) Add to the top of the sponge mixture in the pan: 2-1/4 c. freshly-milled whole wheat flour 2 t. salt (on top the flour) Set the bread machine on regular DOUGH cycle and process. Check the dough to make sure it's formed into a nice soft ball and adjust the hydration as needed. My changes: I process the dough in the bread machine until the dough is mixed and kneaded. I don't let it rise in the machine. I place the dough in a dough rising bucket, place the lid on the top and allow the dough to ALMOST rise to double. Whole wheat dough does NOT have the extensibility that white bread dough does, so try not to let it go more than double. Using a dough rising bucket helps you to accurately judge when dough has doubled. Place the dough into a dough rising bucket. It should come up to the 1-quart line. It's doubled when it reaches the 2-quart line. You can get plastic food storage containers (with a tight-fitting lid and graduated measures on the side) at restaurant supply stores (or through King Arthur Flour - aka dough doubler). For this recipe a 2-quart container works perfectly.) After the bread machine finishes the dough cycle (or has doubled in the dough rising bucket), dump the dough onto a Silpat and with oiled/greased hands deflate the dough by pushing it in the middle with your fist then drawing all edges of the outside dough into the middle (turning the dough inside-out so to speak). Divide the dough into portions (I scale the dough for accuracy.) Round each portion (make it into a smooth ball) so that all the gluten strands are going into the same direction. Cover and allow to rest 10-15 minutes so the gluten relaxes. Form dough, pan, cover with plastic wrap for the final proofing - etc.... I make this bread into 3 small loaves (7-1/2x3-1/2-inch pans - 350°F for 20-25 minutes), OR one 1# Pullman Loaf and use the other 1# of dough for 6 pecan rolls OR an 8-inch pan of dinner rolls - sometimes I use a portion of the recipe for hamburger or hot dog buns. A very versatile dough. ------------------------------------------------------ * ascorbic acid powder is available at most health food stores. It's a very important ingredient ANY time you make bread that includes wheat germ (which is in whole wheat flour). There is a substance in wheat germ called Glutathione. This substance breaks down the gluten and can result in a short loaf. The bran in whole wheat bread can also cut the gluten strands which results in a short squatty loaf. The sponge helps to soften the bran. The addition of 1/8 t. ascorbic acid per loaf of bread will counteract the negative effects of Glutathione. It will help prevent the gluten bonds from breaking down and will also help repair gluten bonds that have been broken. The ascorbic acid also helps sustain the leavening of bread loaves during baking. Yeast grows longer and faster when there is also ascorbic acid. Do not add it to sourdough recipes because they are naturally an acidic atmosphere. ** Chia seed gel is a mixture of chia seeds and water (1 part chia seeds to 9 parts water). This mixture thickens as the seeds absorb the water and adds hydration to the crumb of the loaf. It looks like poppy seeds in the bread after it's baked. Excellent nutritional boost and additional fiber. By hand, place sponge ingredients in a glass or plastic bowl and mix the sponge ingredients together with a Danish dough whisk or a wooden spoon and beat the ingredients about 100 strokes. Cover, and allow to sit at room temperature at least 2-1/2 hours. After the sponge is done: add the flour gradually to the sponge mixture using a Danish dough whisk (or wooden spoon) and carefully beat in each addition of flour before adding more. You may end up beating the dough 500-800 strokes, but do as much mixing as you have the strength to do. If you need to stop and rest, that's fine. The rest will allow the dough to hydrate. Towards the end of mixing, add the salt (DON'T FORGET!!!). The gluten will tighten up and make mixing harder after adding salt. The better job you do of mixing the dough and developing the gluten while it's in the bowl, the less time you'll need to knead it. When you knead the dough, avoid adding a lot of bench flour. If you have a problem adding too much flour during kneading, grease/oil your hands during kneading instead - especially during the last 2-3 minutes of kneading. -Grainlady...See MoreSaving Time so You Can Save Money
Comments (11)I'm not sure I'll be much help on this subject since I'm just now decluttering and reorganizing my home. Here's a few little things I'm doing: Since I don't have a regular pantry (I'm going to make one somewhere, someday--lol) I keep all breakfast items in one drawer, like instant oatmeal, grits, hot chocolate, etc. So, I know in a glance what I need and don't buy extras. I just tear off the top of the pkg. and set the whole thing in the drawer. I also keep my ironing supplies on one drawer---irons, spray starch, etc. I actually had to buy a second iron because I couldn't find the first one---before I organized! I took all on my junky paper and cut it into note size, put it in my desk drawer. If I have pretty junky mail, or envelopes, I cut them up to use as gift tags or small note cards. I hate frying bacon, so I bake it now on a rack. It's healthier and I don't have to spend so much time at the stove. I actually baked a pkg. this morning, used it all at once---now, we have bacon for tomorrow. I don't have very many closets, so I'm using decorative tins and hatboxes (I went thru a hatbox-making phase a few years back) for storage of sewing and craft supplies, and anything else that I can't find a place for!!! LOL These things hold a lot, so I may not have to buy any shelves. In my foyer area, I have a narrow table with a mirrow above it. I just cleaned out that drawer in the table----I have a place for car keys (his & hers), gloves, hairbrush, and glasses. Since I wash my hands a zillion times a day, I keep either an old dish detergent bottle or shampoo bottle with soap, water (*and now hand lotion or baby oil mixed in) under the sink to wash hands with. I just saw a Dr. on Tv say that if you wash your hands too much and they're dried out, germs can enter your body thru the cracked dry skin EASIER!! They were talking about the flu viruses. He actually said that rubbing your hands back and forth, creating friction, would kill germs on your hands!! Rub your hands, rub your hands!!!!!!...See Morelucillle
9 years agofireduck
9 years agowoodcutter2008
9 years agogreenman62
9 years agolucillle
9 years agofusion_power
9 years agoFrancoiseFromAix
9 years agodbrown2351
9 years ago
lazy_gardens
9 years agogmatx zone 6
9 years agowertach zone 7-B SC
9 years agoryseryse_2004
9 years agolucillle
9 years agohilnaric
9 years agoklem1
9 years agojonathanpassey
9 years agoseysonn
9 years agogreenman62
9 years agogetyourleash
9 years agosharonrossy
9 years agodonna_in_sask
9 years ago
zeuspaul
9 years ago
North Ga Gardener
8 years agoryseryse_2004
8 years agokitasei
8 years agoNorth Ga Gardener
8 years agoryseryse_2004
8 years agoparker25mv
8 years agolast modified: 8 years ago
bragu_DSM 5
8 years agolast modified: 8 years agomaxjohnson
8 years agoUser
8 years ago
Seysonn_ 8a-NC/HZ-7
8 years agoparker25mv
8 years ago
Pumpkin (zone 10A)
8 years agogreenman62
8 years agofireduck
8 years agoLoneJack Zn 6a, KC
8 years ago
albert_135 39.17°N 119.76°W 4695ft.
8 years agoUser
8 years ago PRO
PROMpesa Rates
8 years agokitasei
8 years agoalbert_135 39.17°N 119.76°W 4695ft.
8 years agomlissca
8 years agoNorth Ga Gardener
8 years agoPumpkin (zone 10A)
8 years agoNorth Ga Gardener
8 years agoSeysonn_ 8a-NC/HZ-7
8 years ago


Related Stories

EDIBLE GARDENSHow to Grow Your Own Sweet Summer Crops
This guide will help any gardener get started on growing the freshest warm-season veggies and berries for summer
Full Story
FARM YOUR YARD6 Things to Know Before You Start Growing Your Own Food
It takes time and practice, but growing edibles in the suburbs or city is possible with smart prep and patience
Full Story
FARM YOUR YARDTo Get the Food They Believe In, These Urbanites Grow Their Own
Home gardeners farming on their city lots find that local, organic food isn’t the only reward
Full Story
KITCHEN CABINETS9 Ways to Save Money on Kitchen Cabinets
Hold on to more dough without sacrificing style with these cost-saving tips
Full Story
EDIBLE GARDENSHow to Grow Your Own Peaches and Nectarines
Make gardening a little sweeter with these juicy fruits, which you can eat after plucking or preserve for later
Full Story
EDIBLE GARDENSSummer Crops: How to Grow Tomatoes
Plant tomato seedlings in spring for one of the best tastes of summer, fresh from your backyard
Full Story
GARDENING GUIDESCool-Season Vegetables: How to Grow Chard
A year-round garden favorite with a colorful stem, Swiss chard comes into its own in early spring and in fall
Full Story
EARTH DAYGrow a Beautiful Garden With Ecofriendly Greywater
Reducing home water waste means lower bills and a healthier planet. Here's how to set up a greywater home irrigation system that can help
Full Story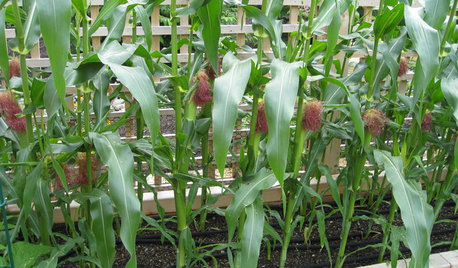
SUMMER FRUITS AND VEGETABLESHow to Grow Your Own Fresh, Sweet Corn
Here's how to plant and care for your own mini cornfield
Full Story
FLOWERSHerb Garden Essentials: Grow Your Own Fragrant Lavender
This do-it-all plant is ideal for almost any garden, and its uses are abundant around the home
Full Story
ajames54